Install Home Assistant with Lubuntu and VirtualBox - Home Assistant Installation Guide.
I want to build a smart home, but I have a tight budget. After some research, I found out Chinese brands produce many good values sensors and devices. Most of them are compatible with Tuya or eWeLink only but not compatible with each other. That means eWeLink sticks with eWeLink's devices, unable to communicate with other platform's devices.
Some devices on the market are compatible with more than one platform(Homekit or Google Home). But, I don't think I have the budget to pay for the compatibility.
What is Home Assistant?
In the research, I discover Home Assistant. In short, Home Assistant is open-source software that features centralized control of all smart devices. The Home Assistant officially supports Tuya and eWeLink integration, which means Tuya and eWeLink's devices can exchange data with Home Assistant. It makes the non-compatible devices can cooperate. With Home Assistant, I can do something, like if my eWeLink's motion sensor detected a motion, then turn on my Tuya compatible light bulb. Home Assistant can do more than that. For the details, you can check the website.
Which methods to install?
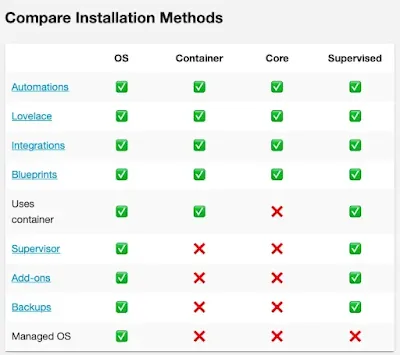 |
| Comparison from Home Assistant |
Before installation, let's choose a methods suit for my case. Home Assistant officially provides four ways to install it: OS, Container, Core, and Supervised. Different installation methods will affect the functionality. I got my old laptop sitting on my bookshelf for doing nothing but collecting dust, waiting for me to re-use it.
I need the MQTT server and motionEye add-ons from the Home Assistant. For this reason, my options are down to two methods: OS and Supervised.
Secondly, I think using a virtual machine to install Home Assistant is easier. Type 2 Hypervisors like VirtualBox, Parallel, and others are intuitive, user-friendly, and easy to use.
Lastly, my old laptop doesn't equip with UEFI BIOS. For this reason, I can't directly install the Home Assistant operating system on my device.
Because of the reasons above, I decided to run my Home Assistant on Linux with the virtual machine.
Operating System
Let's start with OS.
I picked Lubuntu 20.04 LTS(Long term support) as the operating system. Lubuntu inherits all the good things from Ubuntu and keeps it lightweight. Also, using the LTS version can avoid major updates leading to software conflict issues.
Create Lubuntu bootable USB drive.
Below are the steps to create a Lubuntu USB bootable Drive.
- Download the Lubuntu ISO file from the official website.
- Download Etcher or other tools can help you create a bootable USB drive.
- Plug in your USB drive to a computer.
- Open Etcher(or your tool).
- Drop the Lubuntu ISO file into the Etcher.
- Select the USB Drive you want to create the USB bootable drive. (This action will wipe all the data in the USB drive, Please backup your USB drive before doing this action)
- Click start to create the Lubuntu USB bootable drive.
Once your Lubuntu bootable USB drive is ready, unplug and plug it into the device you want to install Lubuntu. Power on or restart your device and boot into the Lubuntu bootable USB drive.
Enter the boot option menu
The way to enter the boot options menu may vary depending on the manufacturer. Usually, you can see the enter boot options menu hint from the first screen when the computer turns on.
 |
| Press F12 enter the boot options menu for Lenovo G475. |
In my case, I enter the boot options menu by pressing F12 when the first screen shows up.
After entering into the boot options menu, select the Lubuntu bootable USB drive as the drive to boot.
Install Lubuntu
Then, the computer will boot into Lubuntu's live system. You can try out Lubuntu without installing it. Continue to click the install Lubuntu icon, install the Lubuntu OS permanently.
The Lubuntu OS installation is quite simple. The beginning is to set up your personal preferences and user credential. Please remember the user password you entered. It is important! The OS needs the password(your permission) to install or modify anything. When everything is ready, click the install button let the installer do the job.
After the installation, the screen will display a message asking the user to remove the bootable USB bootable drive, then hit the enter key to restart the computer.
Install Virtual Machine
For the virtual machine, I choose Oracle VM VirtualBox. I go to the VirtualBox website and download the installer for Ubuntu.
 |
| "cannot install from unassigned repo" error message |
While installing the VirtualBox, the package installer keeps prompt a "cannot install from unassigned repo" error message.
After searching this error message with Google, I find out a solution using gdebi to install the VirtualBox installer. gdebi is a package installer for the local .deb installer. Also, gdebi will handle all the related dependencies for the selected .deb installer.
Open terminal, type "sudo apt install gdepi" and hit enter key to install gdebi.
$ sudo apt install gdebi
After the installation is complete, type "sudo gdebi <VirtualBox installer path>" in the terminal and hit the enter key to install VirtualBox.
$ sudo gdebi <VirtualBox installer path>
When the installation is complete, you can use the search function to search the VirtualBox and click to open.
Download Home Assistant VirtualBox image.
Log on to the Home Assistant official page to download the Home Assistant image for VirtualBox.
Setup Virtual Machine
Open the VirtualBox and click the New button to create a virtual machine.
The virtual machine creation will require setting up some attributes. Here are the field needs to input some info:
- Name: <Put a name you comfortable with it >.
- Type: Linux.
- Version: Other Linux (64-bit)
- Memory Size: 2048 MB (2048 MB is the minimum requirement for Home Assistant
- Hard disk: check the "Use an existing virtual hard disk file" and select the Home Assistant VirtualBox image.
- Click the create button.
After the initial creation, it needs extra steps to allocate the hardware resources.
 |
| Home Assistant Minimum requirement. |
Select the virtual machine created just now, then click the Settings button set it up accordingly:
- Go to the "System" > "Processor" tab, then assign 2 CPUs as the Home Assistant minimum requirement.
- Go back to "System" > "Motherboard", then check the Enable EFI option.
- Go to "Network" > "Adapter 1" tab, select "Bridged Adapter" from the "Attached to" dropdown list. Pick your current network(WiFi or Ethernet) from the "name" dropdown list.
- Last, go to "Audio". Select "Intel HD Audio" from the "Audio Controller".
Now, you can start the virtual machine. The Home Assistant OS will initiate all the modules and functions. Once the screen prompts out the web portal address, you can access the Home Assistant via the web browser.
For the first time, Home Assistant may take up to 20 minutes to initialize the web portal.
When the Home Assistant portal is ready, It will request the user to set up the login information, user preferences and integrate with the existing devices supported by Home Assistant(if Any).
Afterward, the Home Assistant installation is complete!


