DIY an MQTT Temperature and Humidity Sensor with Arduino, ESP-01S(ESP8266) and DHT22.
 |
| ESP-01S and DHT22 |
Last year, I made a temperature and humidity sensor that can integrate with Apple HomeKit. I find a way to flash the firmware from ESP Home Devices and do the minimum configuration to make the whole thing works.
This year, I want to learn something new. I will use the same hardware but code the software part. I will use Arduino to make the coding part easier. Also, I will use the MQTT protocol to allow the sensor to communicate with others.
My last article is a guide to installing Home Assistant on VirtualBox virtual machine. So, I will integrate the sensor with Home Assistant. Then, using the Home Assistant feature to make the sensor HomeKit compatible.
This article focuses on creating a sensor that can communicate with other MQTT clients. The HomeKit compatible part will be in the following article.
Prerequisite:
Let's start to prepare some hardware and install some software.
Hardware:
Use the same old things from the previous project.
 |
| Hardware will be used in this project. |
- ESP-01 USB Programmer with CH340C
- ESP-01S
- DHT22 Temperature and Humidity Sensor Module
- Ywrobot Power BM V2 (Power supply module)
- 9V power adapter.
- 400 pin breadboard.
- 3 x male-to-female jumper wires.
- 2 x male-to-male jumper wires.
Software:
This project needs to download Arduino IDE itself. The additional work is to set up the Arduino IDE environment for ESP8266. You can check my old article to learn more.
Code:
After everything is in place, we can start writing some code.
Install libraries
First, we need to get help from some libraries, which includes:
- DHT
- ESP8266WiFi
- PubSubClient
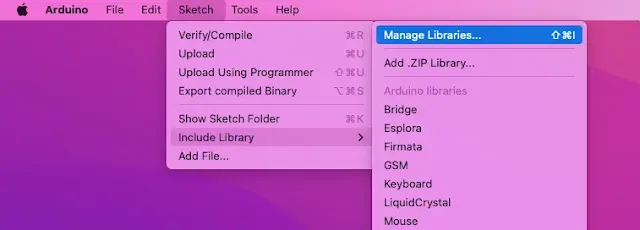
All these libraries, you can get in the Library Manager. Go to Sketch -> Include Library -> Manage Libraries... -> search and install all three libraries.

|
| Path to search and install libraries. |
It may prompt a window to ask for installation of another dependent library, install all to ensure proper functioning.
Include libraries
At the beginning of the sketch, include all the libraries.
  #include <DHT.h>
  #include <ESP8266WiFi.h>
  #include <PubSubClient.h>
Declaration and Initialization Globa Variables
After including all the libraries, we need to declare and initial the variable or constants before using them.
DHT
Create two constant names as DHTPIN and DHTTYPE.
The DHTPIN holds the ESP-01S's GPIO PIN that connects to the
DHT22 sensor, and the DHTTYPE stores the DHT sensor model.
  // DHT22 Sensor
  #define DHTPIN 0 // ESP-01S using GPIO0 to read data from DHT22
  #define DHTTYPE DHT22 // DHT sensor model: DHT11, DHT21 and DHT22, this project using DHT22
  DHT dht(DHTPIN, DHTTYPE);
WiFi Credential
Declare two constant that holds the WiFi SSID and Password will be used later for ESP-01S connect to a WiFi access point.
  // WiFi Credential
  const char* WIFI_SSID = "<Your WiFi SSID>";
  const char* WIFI_PASS = "<Your WiFi Password>";
MQTT
Create two constant that holds the MQTT Broker info and add another for the
MQTT topic.
For testing purposes, I will use the free Eclipse Mosquitto MQTT broker.
  // MQTT Broker
  // Using Public Free Eclipse Mosquitto MQTT Broker
  // For Testing Purposes only
  const char* BROKER = "test.mosquitto.org";
  const int BROKER_PORT = 1883;
  const char* PUB_TOPIC = "<Your Topic String>";
WiFiClient and PubSubClient
Declare two variables using WiFiClient and
PubSubClient object names . Pass the
WiFiClient variable to the
PubSubClient constructor to initialize the
PubSubClient variable.
  // WiFiClient and PubSubClient
  WiFiClient espClient;
  PubSubClient client(espClient);
Miscellaneous
The msg character array variable will store the MQTT message.
The lastMsg and interval long variables will use
to keep tracking the loop function execution timestamp.
humidity and temperature float variables will hold
the reading from the sensor.
  #define MSG_BUFFER_SIZE  (50)
  char msg[MSG_BUFFER_SIZE];

  unsigned long lastMsg = 0;
  unsigned long interval = 1000UL * 60 * 0.5; // 0.5 mean 30 seconds, you modify to suit your needs

  float humidity;
  float temperature;
Write a Setup WiFi Function.
This setup_wifi() is t let the ESP-01S connect to the
selected SSID WiFi. With the Serial.print(), you can keep
tracking the WiFi connecting status in the Serial Monitor.
  void setup_wifi() {

    Serial.println();
    Serial.print("Connecting to ");
    Serial.println(WIFI_SSID);

    WiFi.mode(WIFI_STA);
    WiFi.begin(WIFI_SSID, WIFI_PASS);

    while (WiFi.status() != WL_CONNECTED) {
      Serial.print(".");
      delay(500);
    }

    Serial.println("");
    Serial.println("WiFi connected.");
    Serial.println("IP address: ");
    Serial.println(WiFi.localIP());
  }
Write an MQTT Reconnect Function.
This function will make sure the ESP-01S has a connection with the MQTT broker.
  void reconnect() {
    while(!client.connected()) {
      Serial.print("Attempting MQTT connection...");
      // Create a random client ID
      String clientId = "ESP8266Client-";
      clientId+= String(random(0xffff), HEX);

      if(client.connect(clientId.c_str())) {
        Serial.println("connected");
        client.publish(PUB_TOPIC, "hello world");
      } else {
        Serial.print("failed, rc=");
        Serial.print(client.state());
        Serial.println(" try again in 5 seconds");
        delay(5000);
      }
    }
  }
Setup Function
All the initialization work should be here.
  void setup() {
    Serial.begin(9600);
    dht.begin();
    setup_wifi();
    client.setServer(BROKER, BROKER_PORT);
  }
Loop Function
The loop function is quite self-explain. The first line of code validates the connection between ESP-01S and MQTT. After that, I set a time Interval for the following code to execute. The following code will start reading the temperature and humidity measurement from DHT22 and publish the values with a topic to the MQTT broker.
  void loop() {

    if(!client.connected()) {
      reconnect();
    }
    client.loop();

    unsigned long now = millis();

    if(now - lastMsg > interval) {
      lastMsg = now;

      humidity = dht.readHumidity();
      temperature = dht.readTemperature();

      snprintf (msg, MSG_BUFFER_SIZE, "Humidity: %.02f and Temperature: %.02f Celsius.", humidity, temperature);
      Serial.print("Publish message: ");
      Serial.print(msg);
      client.publish(PUB_TOPIC, msg);
    }
  }
Full Code:
Upload the Sketch

|
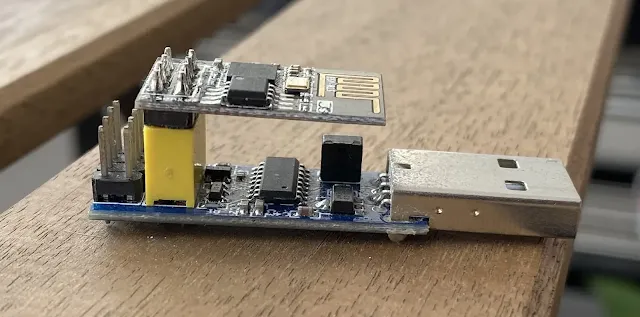
| ESP-01S Plug into a USB Programmer. |
When the sketch is complete, I will use the USB programmer to upload the code into ESP-01S.
I strongly recommend buying a USB programmer to make life easier.
Plug the ESP-01S into the USB programmer and plug it into the computer's USB port.
Back to the Arduino IDE and go to Tools -> Port to select the USB port plugged into the USB programmer.
 |
| Select the correct port in Arduino IDE |
Then, click the Upload button.
 |
| Upload completed result. |
Once the upload is complete, the ESP-01S is ready to wire up with the DHT22 and power supply module.
Wire up
The wire up is quite direct. Just a few things need to be aware.
The Ywrobot Power BM V2 can supply two voltages: 3.3V and 5V, the 5V wiring up to ESP-01S can fry up the module.
Also, the DHT22 needs to supply 5V to it.

|
| MQTT Temperature and Humidity Schematic |
One last check before powering up the whole thing, make sure all the wires connect to the correct pins.
Another MQTT Client
When you power up the whole thing, you only can check the status via Serial Monitor. So, how about the MQTT message that sends out from the ESP-01S?
Now, I create an MQTT client that subscribes to the same topic. Therefore, I can verify the MQTT message sent from ESP-01S.
Another MQTT client uses Python to write, so make sure your computer installed Python. Also, your computer needs to install the Eclipse Paho MQTT Python client library. Download the Python file and execute it on your computer.
Full Code:
Then, power up the MQTT temperature and humidity sensor.
The Final Result
Assume everything performs correctly. The MQTT Python client should receive some messages from the MQTT sensor.
 |
| MQTT Python client received messages from MQTT sensor. |
I hope we have learned something from this post.


%20with%20Rechargeable%20NiMH%20batteries%20and%20HT7833%20voltage%20regulator%20cover.webp)

